 |
| How to Install Python on Windows 11 |
Python is a popular programming language and is widely used in various fields such as data processing, automation, machine learning, game development, and web development.
The reason why Python is widely used and popular today is because it is easy to understand, has many libraries, and have a large community.
So, for that we can start learning Python by installing it on our computer, by following the steps below on Windows 11 with easy tutorial.
Tutorial Installing Python on Windows 11
For installing python on the Windows 11 operating system, we can do with following steps correctly.
1. Get Python from official website
First we need get the latest stable version of python installation file for windows from official website python https://www.python.org/downloads/windows/ and choose 64-bit from stable version.
Why 64-bit? because most laptops or computers that we use on Windows 11 have a 64-bit processor architecture, so we choose the same processor architecture that we use. So when it take files may need several times depends on speed internet connection.
2. Python Setup Installation
After getting the software, we can carry out the installation process on our computer.
 |
| Preparation Installation Python Software |
double click on the file and wait a while until the initial settings menu appears, then give tick:
- Use admin privileges when installing
- Add python to PATH
Add python to PATH is use for provides guidance to the Python interpreter about where to find various libraries and applications. After it we can select customize installation, and do next step like this.
 |
| Setup Installation |
After that, optional features will appear, we can more give tick:
- Documentation
- pip
- tcl/tk and IDLE
- Python test suite
- py launcher
- for all users
where the documentation serves as a guide in using programming languages, then pip as a python package installer which is used in various ways such as in micropython, after looking like this we can do the next process.
 |
| Optional Features Setup Installation |
In advanced options we just give some tick on few options:
- Associate python with files
- Create shortcuts
- Add python to environment variables
After all that we just need to continue with the installation.
 |
| Advanced Setup Installation |
And the installation process will appear on your computer, waiting for it to finish may take a few minutes.
 |
| Installation Process |
3. Run Python for the first time
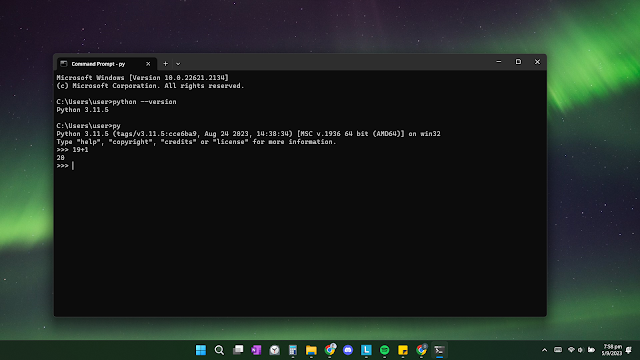
When all process has been successful, we can immediately try using python by running a command at the command prompt using the following command:
python --version
Then the version that matches the version we are using will appear after using this command at the command prompt. Because we are using the release version 3.11.5, it will appear correctly on our computer, namely 3.11.5.
 |
| Checking Version Python |
And we can immediately try to run python by using the following command in the command prompt
py
with the command interpreter mode will appear and we can try to run it directly, for example by calculating the sum of 19 +1 which results in 20.
 |
| Running Python Interpreter |
If there is anything you want to ask, please ask.


Post a Comment